
1. 서론
요즘 MCP에 관해 유튜브에서나 블로그에서나 많은 글과 영상들이 있는데요. 간단하게 Spring AI로 MCP 서버를 구축하는 법을 알려드리겠습니다.
2. MCP Server 설정 및 구축
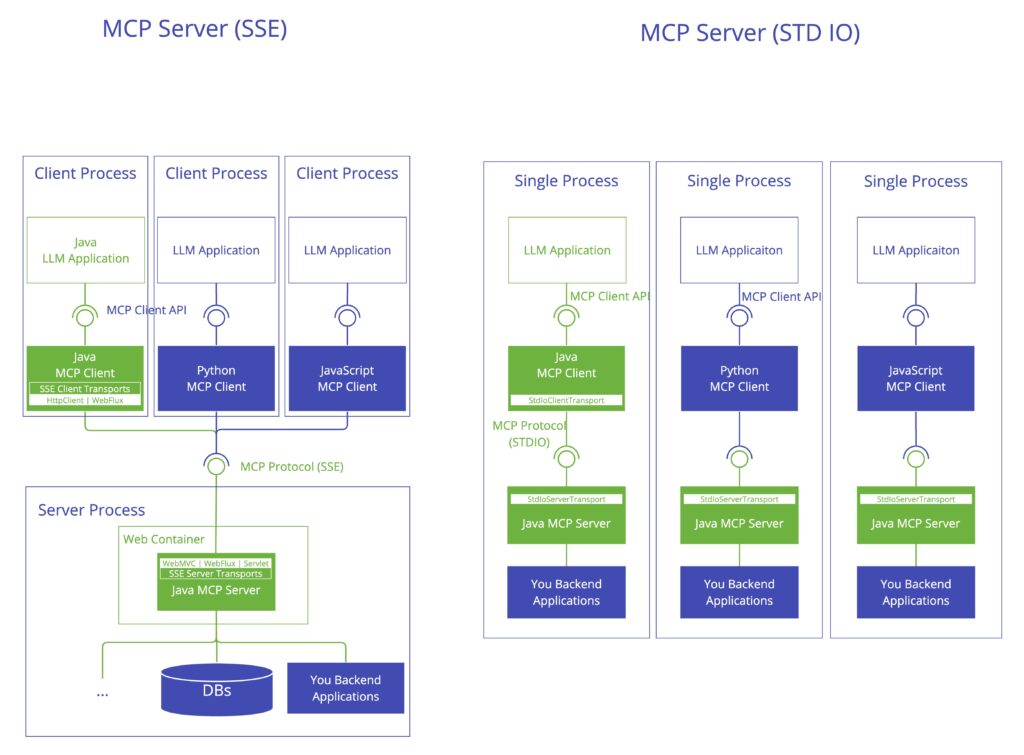
SSE 방식와 STDIO방식이 있는데 STDIO 방식으로 설명하겠다.
STDIO방식은 클라이언트에 jar파일 위치를 넣어주면 되고, SSE 방식은 띄워진 서버의 url을 전달하면 된다.
- 의존성 추가
repositories {
    mavenCentral()
    maven { url 'https://repo.spring.io/milestone' }
    maven { url 'https://repo.spring.io/snapshot' }
    maven {
        name = 'Central Portal Snapshots'
        url = 'https://central.sonatype.com/repository/maven-snapshots/'
    }
}

dependencies {
    implementation platform("org.springframework.ai:spring-ai-bom:1.0.0-SNAPSHOT")
}

dependencies {
    implementation 'org.springframework.ai:spring-ai-starter-mcp-server'
}
기본 스프링 의존성에 위와 같이 mcp-server를 추가해준다.
- yml 설정
spring:
  main:
    banner-mode: off
    web-application-type: none
  application:
    name: example-mcp
  ai:
    mcp:
      server:
        name: Example-Mcp-Server
        version: 0.0.1
logging:
  pattern:
    console:
만약 Claude Desktop에 추가하려면 banner-mode를 끄고 logging console도 꺼야 된다.
- Tools Bean 등록
    @Bean
    public ToolCallbackProvider tools(Object... tools) {

       return MethodToolCallbackProvider.builder()
                    .toolObjects(tools)
                    .build();

    }
파라미터인 Object…는 @Tool 서비스 클래스의 목록을 넘겨주면 된다.
- Tool 서비스
@Service
public class ExampleService {
    @Tool(name = "Get-Example", description = "Get Exmaple")
    public ArrayList<ExampleDTO> projectList() {
       // example sources..
        return ExampleDTO.create(data);
    }
}
이렇게 하면 하나의 Tool(도구)가 등록되었다.
@Tool의 name은 공백이 있으면 안된다.
아주 간단하다. 이게 어찌 보면 MCP 서버 도구 설정 끝이다.
프롬프트나 로깅 등의 다른 설정도 있지만, 마찬가지로 도구 설정하는 것처럼 간단하다. 프롬프트 설정하는 법은 아래 spring 링크를 참고하면 된다.
다음 글에서는 클라이언트를 설정하는 법을 알아보겠다.
https://docs.spring.io/spring-ai/reference/api/mcp/mcp-overview.html
https://docs.spring.io/spring-ai/reference/api/mcp/mcp-server-boot-starter-docs.html
답글 남기기